

Tips for Replacing Car Brake Pads
My car recently failed its annual MOT inspection on worn front brake pads.
Being an experienced engineer, and having even taught GCSE Motor Vehicle studies, I decided to do the work myself.

The first issue was getting the locking wheel nuts off, as the key was slipping.
A tip for doing this is to use youtube and search for removal of locking wheel nuts for your particular car.
Once you have removed the wheel nuts, you may come up against the next challenge, wheel stuck on the hub.
If you have jacked up the car (and used axle stands to support) removed the wheel nuts, and the wheel won’t come off, this is my tip.
Loosely screw the wheel nuts back on about halfway. Then (after removing the axle stand) slowly lower the car jack down.
The weight of the car being put onto the wheel should help loosen the wheel from the hub. You can gently rock the wheel, which may help.
Remember it is vitally important (for safety) that the wheel nuts are screwed on enough to hold the wheel in place, but not so tight that the wheel is tightened against the hub.
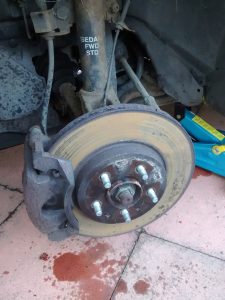
So now hopefully you have managed to remove the front wheel, and have the car supported on suitable axle stands.
The next job is to remove the brake calliper, which is held in place with two 13mm (on my car) bolts.
On a previous car I owned, the bolts had been rounded and damaged, and would not come out using a normal spanner or socket.
A tip for removing the bolts is to use reverse thread ‘bolt grips’. These are special sockets, that ‘bite’ into the rounded bolt, and grip tighter the more torque is applied to them.
Manufacturers of these are Irwin and Ebauer, and they are available from tool supplier, such as Toolstation & Screwfix, among others.
A car manual will be useful if you are not familiar with fitting brake pads, and I accept no liability if you do it incorrectly.
Once you have removed the brake calliper, be careful not to stretch the brake hose, which could cause damage to it.
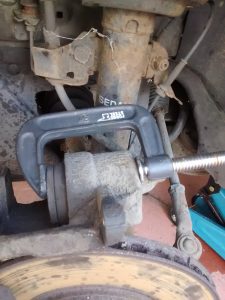
In the picture below, I rested the brake calliper on top of the brake disc, but you could also tie it up to suspend it, to avoid strain to the brake hose.
The existing brake pads should push out of their slots, but you may need to use a large flat blade screwdriver, or similar to prise them out.
Before you can fit the new brake pads, you will need to move the part of the brake calliper that pushes against the brake pad, back fully inside the calliper.
This is because the new brake pads are thicker than the old worn pads, and the calliper has moved outwards to remain in contact with the brake pad, as it wears.
A tip for pushing the calliper ‘piston’ back inside the calliper casing, is to use a ‘G-Clamp’ as shown in the picture.
By screwing in the clamp, the piston will be compressed back into the calliper body.
Be careful to do it slowly and gently, and ensure that the piston is going back inside evenly. If it starts to go at an angle, you can move the G-Clamp to the other side, to compensate.
Once the calliper piston is back level with the calliper casing, you are ready to fit the new brake pads. Use a little brake grease on the contact metal edges, to avoid brake squeal, but never get it onto the brake pad, or brake disc surfaces.
Refer to your car workshop manual, if needed, and fit them in place.
Connect any wear sensor connection wiring, if your car has these.
You should then be able to replace the brake calliper over the new pads, and back into place.
Put a bit of ‘thread lock’ onto the threads of the calliper bolts, and tighten to the manufacturer’s torque settings (you will need a torque wrench for this).
Spin the brake disc to ensure that it turns freely, and then refit wheel.
Job done!!!
It should be noted that the above instructions are only for replacing the brake pads.
Brake pads should always be replaced in axle pairs, in other words, don’t just fit one on the front nearside (UK kerbside), but not do the other front wheel side.
Brake discs, which are the round part that the brake pad squeezes against, also wear, and may also need replacing.
You should check the manufacturers brake disc data, and replace if they have worn thinner that acceptable, or are badly weakened or scored.
You can use a tool called a micrometer to measure brake disc thickness.
Disclaimer
This article is for information only, and the author accepts no responsibility for injury, damage or loss caused by following its instructions.
The article and photos are also copyright 2018 (C) Craig Miles
craigmiles.co.uk